

Xgen is one of the most used groom tools for both professional artists and also students. But the comprehensive information about the usage of the expressions, which is one of the most important parts of the software and whats makes it so strong. So after the request from the Patrons on the channel, I decided to make this guide on how to use some of the most basic expressions that will give you more control over the groom.
The expressions for xgen are based on seexpr that was developed by the Disney. And xgen uses this language as part of his core for the different behaviors, noises and patterns. You can find more information on the RenderMan SeeXpr page and of course Autodesk help page with a guide for the available commands and possible usages. Some other useful links Intro to Xgen Expressions.
On this case we will use my personal library of expressions, developed trough trial and error and with the help of amazing artist and developers.
Reference Videos on Xgen Expressions
* Rand Percentage Basic Expression
Basic Expressions
Density mask * Mask Expression
One of the most important and basic expressions is the multiply/divide operation. This will let you merge, add or subtract any values just as the layers operators in Photoshop or any complex composite system. On this case we will use the * expression to get a multiplier between the mask and a density mask so we can have more control over the borders of the groom.
$mask=map('${DESC}/paintmaps/Mask');#3dpaint,50.0
$density=map('${DESC}/paintmaps/Density');#3dpaint,50.0
$mask*$density
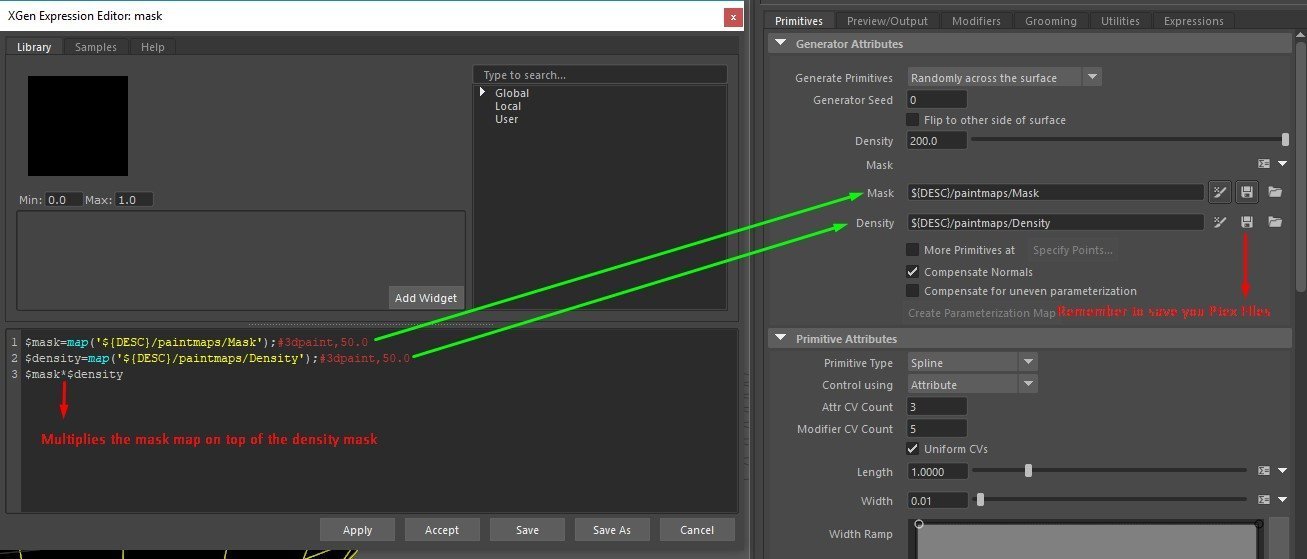
This expression should be written into the mask slot, and when you run it should create two maps one for the “mask” and one for your “density”. Remember to save your iff files when painting and also the ptex files.
Mask
The mask map should be black and white with no fall off or middle values. This mask defines the area were the groom grows. It should be bigger than the actual area of the hair, as the density will define the actual amount of hairs that grows on the specific area.
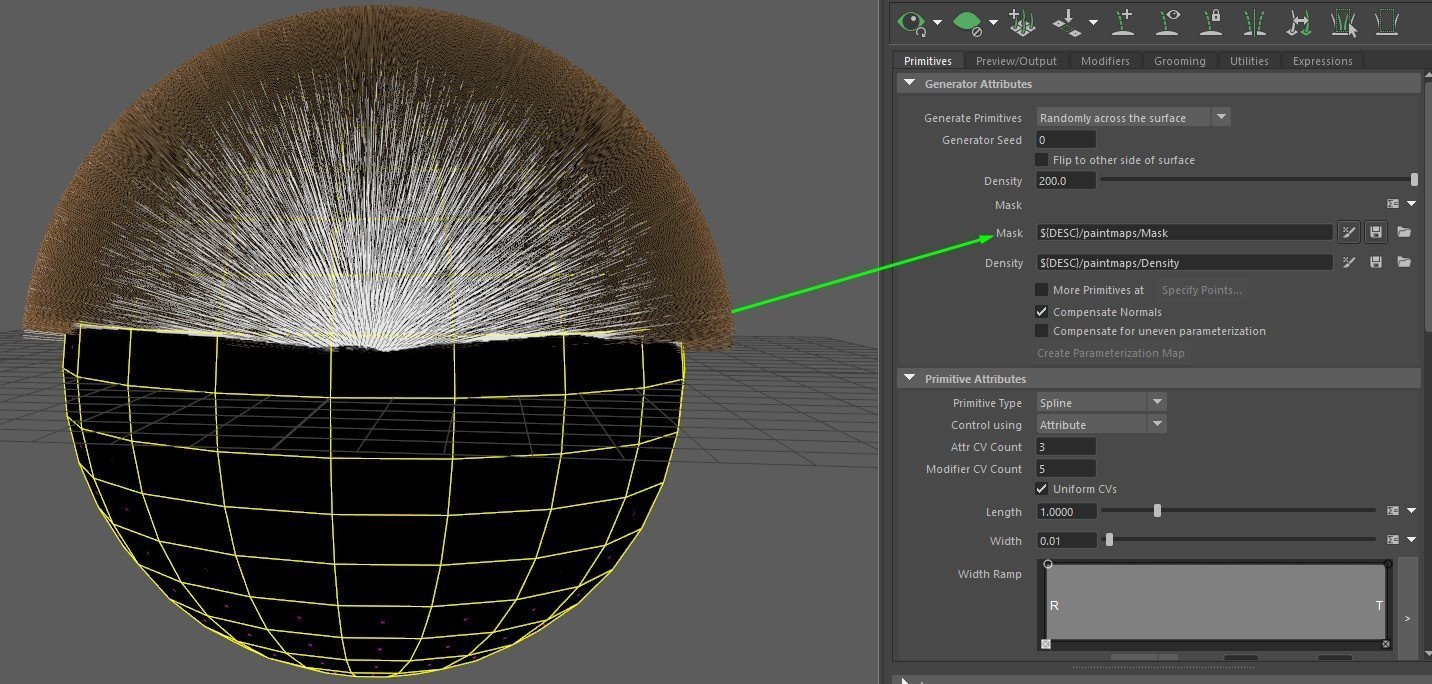
Density
The density mask defines the amount of hairs that should spawn on a specific area of the hair. This mask can have middle values and can go from black ( No hair ) to white ( Maximum hair density). As rule of thumb you should block your density with a 0.5 ( Gray ) value first and block the main amount of hairs like that.

Rand Expression
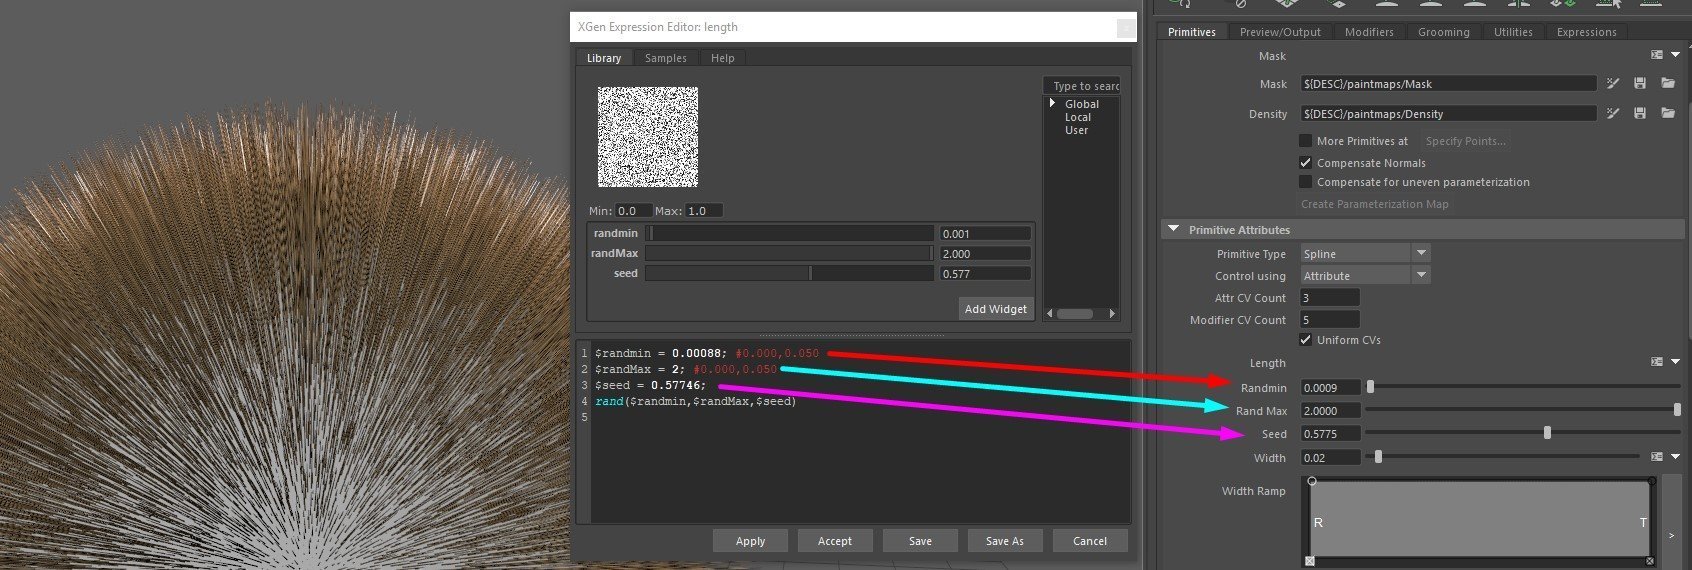
One of the most common expressions that has a big impact of the final result of the grooms is the random. This is a really simple expression but you need to make it properly to avoid flickering or weird behaviors. The basic expression should look like this.
$randValue = and(floatmin,floatmax,seed);
$randValue
Where the “rand” is the function, the “floatmin”defines the minimum value that will result from the expression, “floatmax” defines the maximum value and “seed” will be the distribution of those values, if you change the seed number the values will distribute on a different arrangement.
To properly use this expression I do a simple change to create every value as an slider which give much more control over the distribution of the noise and min and max values.
$randmin = 0.7000; #0.000,0.050
$randMax = 1.0000; #0.000,0.050
$seed = 154.0000;
$randValue = rand($randmin,$randMax,$seed);
$randValue
Percentage Mask
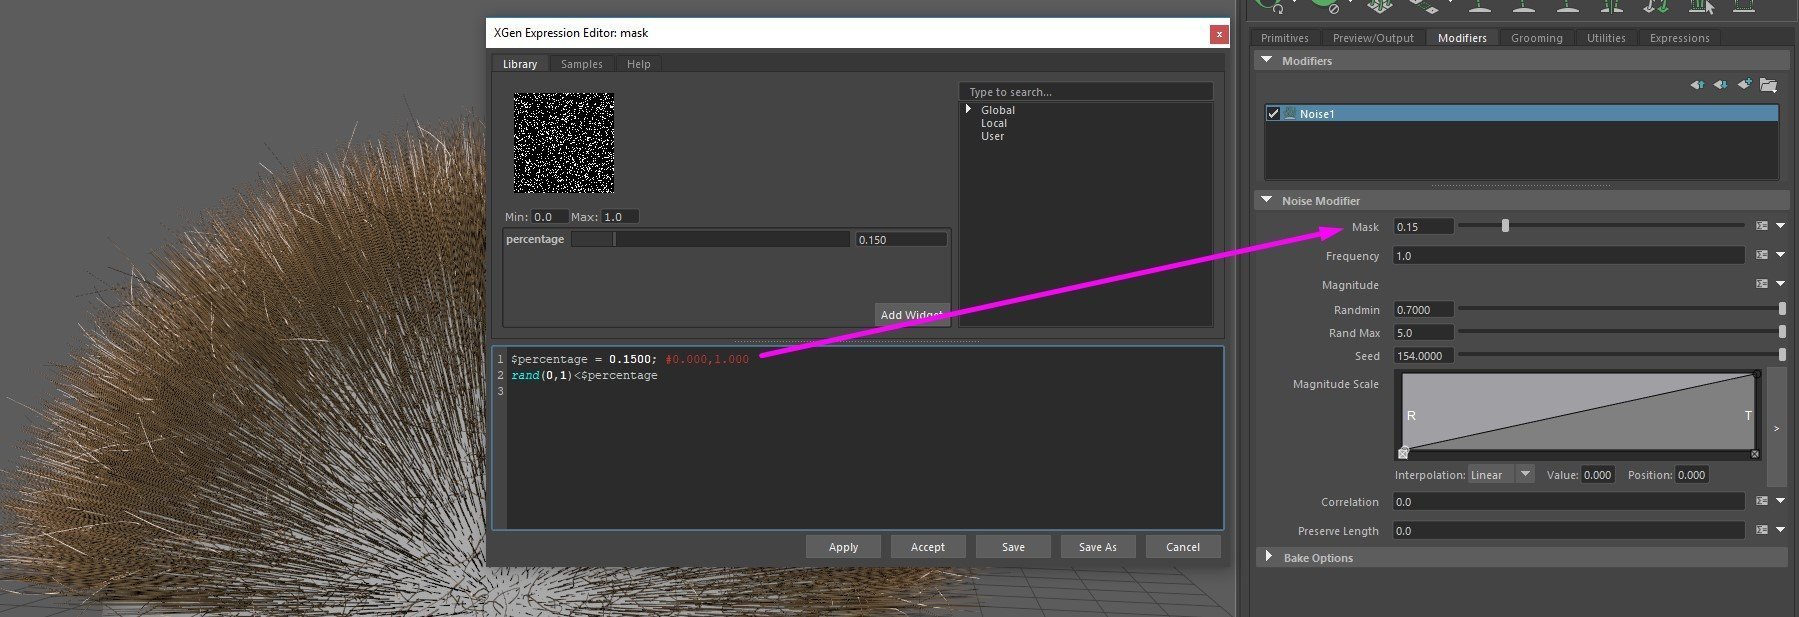
When creating a mask, not always is necessary to create a map. I normally use the percentage mask for flyaway and other basic effects of the noise when I want my mask just to affect percentage of the hairs. On this cases the this expression is really useful. Expression by Fabio Messina.
$percentage = 0.1500; #0.000,1.000
$randValue = rand(0,1)<$percentage
$randValue
This expression is the combination of a random function with a basic minor than (<) which makes the mask to choose between a random value that is smaller than the $percentage value defined on the slider, were a value of 1 meants 100% and a value of 0 means 0%. You can always add a seed value if you need to change the distribution of the hairs being affected.
Normally xgen has the stray() value where you can define a float to affect just a percentage of the hair, the problem with this value is an unique value, so you can not create different percentages, and if you call the stray() value its always going to be the same. Making the percentage expression a real need to create believable characters with different levels of strays and percentage masks.
No mask applied, the noise is affecting 100% of the hairs

Mask applied to a 15 % of the hairs
On this tutorial you can find an example of another percentage expression that will give you the same result, on this case we are using it to create the fly-aways on a basic groom.
Beyond the Sliders: Why Expressions are the Key to Professional Grooming
The transition from an intermediate to a senior grooming artist often involves a fundamental shift in thinking: from direct manipulation to procedural design. A workflow based solely on interactive grooming tools and attribute sliders is inherently destructive and limited. Every change requires manual rework, and achieving complex, natural-looking variation across millions of hairs is a task of Sisyphean proportions.
Expressions offer a superior, procedural paradigm. At its core, proceduralism is about defining a set of rules that generate a result, rather than sculpting the result itself. This approach has several profound advantages in a production environment:
- Non-Destructive Workflow: An expression-driven groom is a living system. Instead of painting a specific length, an artist writes an expression that combines a base length, a control map, and a layer of noise. To alter the look, one simply adjusts a parameter in the expression; the entire groom updates automatically without any loss of detail.
- Art-Directable Complexity: Nature is a blend of order and chaos. Expressions allow artists to replicate this. A groom can be defined by broad, controllable shapes (using guides and maps) and then layered with procedural details like random length variations, clumping breakup, and flyaway hairs.5 This creates a result that feels organic yet remains fully under artistic control.
- Scalability and Efficiency: Manually placing or grooming millions of primitives is impossible. Expressions operate on each primitive individually at render time, allowing for the generation of nearly infinite detail that would otherwise cripple a scene file. This is the "customization of inner loops" that makes SeExpr so powerful in production; it allows artists to inject logic into the most granular level of geometry generation.4
Ultimately, mastering expressions means shifting one's role from a digital sculptor to a designer of procedural assets. The artist is no longer just creating a hairstyle; they are creating the system that generates the hairstyle. This system is more flexible, more powerful, and far better suited to the iterative demands of a professional VFX pipeline.
Anatomy of an Expression: The XGen Editor and Core Syntax
Before writing the first expression, it is essential to become familiar with the primary workspace: the XGen Expression Editor. This window is the command center for all procedural logic within a groom. It can be accessed by clicking the expression icon (Σ) next to any attribute slider in the XGen Editor.6
The editor interface is designed for artists, providing several key features to streamline the workflow 6:
- Expression Edit Area: The main text field where expressions are written.
- Syntax Highlighting: Different parts of the expression—such as variables, functions, and comments—are color-coded for readability. For example, functions typically appear in cyan, global variables in green, and comments in red.
- Text Auto-Completion: As one types, the editor suggests relevant functions and variables, reducing syntax errors and the need to memorize every function name.
- Library and Samples Tabs: These tabs provide access to pre-built expressions that ship with Maya, as well as any expressions the user has saved. This is an excellent resource for learning and for storing reusable code snippets.
- Value Controls (Widgets): Declaring a local variable with a special comment format automatically creates an artist-friendly slider or color picker in the editor. This is the key to making expressions interactive and easy to adjust without needing to edit the code directly.
The SeExpr language itself is built on a few simple but strict syntax rules 7:
- Variables: All variables, both built-in (global) and user-defined (local), must begin with a dollar sign (
$). For example,$lengthor$id. - Statements: Every complete command or variable declaration is a statement and must end with a semicolon (
;). - Comments: To add notes or disable a line of code, use a pound sign (
#). Everything from the#to the end of the line is ignored by the engine. - Return Value: An expression must ultimately return a single value (either a scalar float or a vector). The final line of the expression, which is the value to be passed to the attribute, should not end with a semicolon.
Key Global Variables in XGen
Global variables are the expression's connection to the world. They are read-only values provided by XGen that describe the state of each primitive being generated. Understanding these is the first step toward creating context-aware effects.
Crucial for avoiding jitter/flicker in animation. Using $Prefg for noise functions ensures the pattern is calculated based on the original mesh shape, making the noise stick to the surface consistently as the character moves.10
$NThe surface normal vector at the primitive's root.Orienting primitives or effects away from the surface, such as making grass point straight up regardless of the terrain's slope.$idA unique, random integer assigned to each primitive.A stable seed for rand() functions. Using $id ensures that each hair gets a consistent random value that does not change from frame to frame, preventing flickering.$frameThe current animation frame number.
Creating animated or time-varying effects, such as procedural wind that changes over time or a color pattern that pulses.11
The distinction between $P and $Prefg is a critical piece of production knowledge. Artists new to expressions will intuitively use $P for noise, only to discover their groom flickers and swims during an animation test render. This occurs because as the underlying mesh deforms, the world-space position $P of a given point on the surface changes, causing it to sample a different point in the 3D noise field on each frame. $Prefg solves this by always sampling the noise based on the character's bind pose, resulting in a stable pattern that deforms correctly with the surface.10 A simple rule emerges from this:
Always use $Prefg for noise patterns unless the specific creative goal is to have the texture swim across the surface.
The First Tool: Creating Variation with rand()
The simplest yet most fundamental task for an expression is to break up the uniformity of a groom. The rand() function is the primary tool for this job. It generates a random floating-point number within a specified range, allowing for subtle, natural variations in attributes like length, width, and orientation.12
A common workflow, popularized by artists like Jesus FC, involves creating user-friendly sliders to control the rand() function's parameters. This makes the expression highly art-directable.1
Code Example: Art-Directable Length Variation
This expression, when applied to the Length attribute of a Spline primitive, will introduce random variation controlled by interactive sliders.
Code snippet
// 1. Define artist-friendly sliders in the UI.
// The comment format #min, max creates a slider.
$minLength = 0.8; #0.0, 1.0
$maxLength = 1.2; #1.0, 2.0
$seed = 1.0; #1, 1000

// 2. Generate the random value.
// We use the unique primitive ID ($id) as a stable seed
// so the random value for each hair doesn't change every frame.
// Adding our custom $seed allows us to change the random pattern.
rand($minLength, $maxLength, $id + $seed)
Breakdown:
- Local Variables: The first three lines define local variables:
$minLength,$maxLength, and$seed. The special comment format (#min_value, max_value) instructs the XGen Expression Editor to create interactive float sliders for each. This allows an artist to adjust the range of randomness and the overall pattern without touching the code.6 - The
rand()Function: The final line is the return value. It calls therand()function with three arguments:- Minimum Value:
$minLength - Maximum Value:
$maxLength - Seed:
$id + $seed. The seed determines the sequence of random numbers. By using the primitive's unique$id, each hair gets its own consistent random value. Adding the artist-controlled$seedvariable allows for changing the entire random pattern simply by adjusting the slider.
- Minimum Value:
This simple expression encapsulates a core principle of production-friendly grooming: abstracting technical parameters into intuitive, artistic controls.
Painting with Data: Driving Attributes with the map() Function
While rand() is excellent for chaotic, fine-grained detail, much of a groom's appearance is defined by larger, deliberate shapes. This is where texture maps become essential. The map() function is the bridge between painted Ptex maps and XGen attributes, allowing artists to control parameters like density, length, and modifier effects with the familiar workflow of a paintbrush.13
The basic syntax for the map() function is straightforward:
$variable = map('path/to/map.ptex');
However, for a robust and portable workflow, it is critical to use XGen's internal variables to define the path 1:
$myMap = map('${DESC}/paintmaps/length');
Breakdown:
$myMap: A local variable to store the value read from the map for the current primitive.map(): The function that reads a Ptex file.'${DESC}/paintmaps/length': This is the crucial part.${DESC}is a global variable that resolves to the directory of the current XGen Description. This creates a relative file path, ensuring that the groom will still find its maps even if the entire project folder is moved to a different computer or directory.14 Thepaintmapsfolder is the default location where XGen saves maps created using its 3D paint tools.
To use this, an artist clicks the downward arrow next to an attribute slider (like Density), selects "Create Map...", defines a resolution, and saves. This action automatically generates the necessary folder structure and a base expression in the editor, which can then be modified.13
The Power of Combination: Layering Maps and Randomness
The true power of expressions emerges when these fundamental tools—rand() and map()—are combined. A common and highly effective technique is to use a map to define the overall form and then multiply its values by a rand() function to add localized, natural breakup. This layered approach provides both broad artistic control and fine, procedural detail.
For instance, to control hair length, an artist might paint a map where the hair is longer in the back and shorter in the front. Then, to avoid a perfectly smooth, artificial-looking result, a small amount of random variation can be applied on top of the map's values.
Code Example: Combining a Length Map with Random Variation
Code snippet
// 1. Load the painted Ptex map that defines the overall hair length.
// The #3dpaint, 50.0 comment sets the map resolution if created from within XGen.
$lengthMap = map('${DESC}/paintmaps/length'); #3dpaint, 50.0

// 2. Define sliders for the random variation amount.
$randMin = 0.9; #0.0, 1.0
$randMax = 1.1; #1.0, 2.0

// 3. Generate a random multiplier for each hair.
$variation = rand($randMin, $randMax, $id);

// 4. Multiply the value from the map by the random variation.
// This scales the map's value up or down slightly for each primitive.
$lengthMap * $variation
This expression creates a powerful, layered effect. The artist can make broad changes to the hairstyle by repainting the length map, while simultaneously tweaking the sliders for $randMin and $randMax to control the amount of frizz and breakup. This combination of painted and procedural control is a cornerstone of advanced grooming workflows.10
Part 2: Intermediate Artistry - Mastering Procedural Control
With a solid foundation in variables, randomization, and maps, the next step is to explore the richer palette of functions that SeExpr offers. This section delves into the world of procedural noise for creating organic patterns, functions for precisely shaping values, and techniques for controlling effects along the length of each individual hair.
The Soul of Proceduralism: An In-Depth Guide to Noise Functions
If rand() provides simple chaos, noise functions provide structured, naturalistic chaos. They generate patterns that are essential for simulating the complex details found in nature. Unlike rand(), which produces a completely different value for every input, noise functions produce a smooth, continuous field of values. This property is what makes them ideal for creating everything from gentle waves in hair to the intricate patterns of fur.7
The choice of noise function is an artistic one, as each type produces a distinct visual character.
noise() (Perlin/Simplex Noise)
This is the most fundamental noise type. It generates a smooth, rolling pattern of values. In its simplest form, it can be used to add gentle, large-scale waves or bends to primitives.
- Use Case: Creating soft, undulating waves in long hair or adding a subtle, low-frequency breakup to a field of grass.
- Example:
Code snippet
// Define sliders for frequency and magnitude.
$freq = 5.0; #0.1, 30.0
$mag = 0.2; #0.0, 1.0

// Apply the noise. Use $Prefg for animation-stable results.
noise($Prefg * $freq) * $mag
- In this example,
$freqcontrols the "size" of the noise pattern; higher values result in smaller, more frequent details.$magcontrols the overall strength of the effect.
fbm() (Fractal Brownian Motion)
fbm() is the workhorse for most grooming tasks. It stands for Fractal Brownian Motion and is essentially a function that layers multiple octaves of basic noise on top of each other, each with a higher frequency and lower amplitude.15 This layering process creates a much richer, more detailed, and more natural-looking pattern than a single call to
noise(). It is the key to achieving the multi-frequency detail seen in real fur, which has both large-scale clumping patterns and fine, individual hair frizz.
- Use Case: The default choice for breaking up clumps, adding frizz, creating fur patterns, or modulating any attribute that requires organic, multi-layered detail.
- Key Parameters:
octaves: The number of noise layers to add together. More octaves add more fine detail but increase computation time. A value of 6 is a common starting point.lacunarity: The multiplier that increases the frequency for each successive octave. A value of 2.0 is standard, meaning each layer is twice as detailed as the one before it.gain: The multiplier that decreases the amplitude for each successive octave. A value of 0.5 is standard, meaning each layer contributes half as much to the final result as the one before it.
- Example from Autodesk Documentation 17:
Code snippet
// Define local variables for fine and large scale noise.
$noiseScaleFine = 3.1350; #0, 300.0
$noiseScaleLarge = 4.5300; #0, 100.0

// Layer two fbm calls with different frequencies.
$nBuf = (fbm($Prefg * $noiseScaleFine) + fbm($Prefg * $noiseScaleLarge)) / 2;
- This complex expression demonstrates a powerful technique: adding two
fbmresults together, one for broad shapes ($noiseScaleLarge) and one for fine detail ($noiseScaleFine), to gain even more control over the final noise pattern.
cellnoise() and voronoi()
These functions produce cellular or block-like patterns. cellnoise() generates a field of randomly valued cubes, while voronoi() generates a more organic cellular pattern. While not typically used to directly displace hair, they are invaluable for creating color or length patterns that mimic animal spots or scales.
- Use Case: Driving the color attribute to create leopard spots or giraffe patterns. Driving the
Lengthattribute to create tufts of hair or scales. - Example:
Code snippet
// Generate a cellular pattern.
$pattern = cellnoise($Prefg * 5.0);

// Use the pattern to choose between two colors.
$pattern > 0.5? [0.8, 0.5, 0.1] : [0.1, 0.1, 0.1] // Orange or Dark Grey
Shaping Your Values: Precision Control with Remapping Functions
Noise functions and maps generate raw data, typically in a 0 to 1 or -1 to 1 range. To turn this raw data into a useful artistic effect, it must be shaped, scaled, and constrained. Remapping functions are the essential tools for this process of data manipulation.7
fit(value, oldMin, oldMax, newMin, newMax): This is arguably the most important utility function in SeExpr. It takes a value from an input range (oldMintooldMax) and linearly remaps it to a new output range (newMintonewMax). For example, the output ofsnoise(), which is -1 to 1, can be remapped to a 0 to 1 range suitable for a mask usingfit(snoise(...), -1, 1, 0, 1).clamp(value, min, max): This function constrains a value to a specific range. Any values belowminare raised tomin, and any values abovemaxare lowered tomax. It is crucial for preventing expressions from generating extreme or invalid results, such as negative length.smoothstep(edge0, edge1, value): This function creates a smooth Hermite interpolation between 0 and 1 as thevaluegoes fromedge0toedge1. It is an excellent tool for creating smooth falloffs and transitions, providing a more aesthetically pleasing result than a sharp, linear change.gamma(value, g)andbias(value, b): These functions adjust the curve of a value.gammaapplies a power function, useful for brightening or darkening the mid-tones of a noise pattern.biasis a variation of gamma that provides a more intuitive 0 to 1 control for pushing a curve up or down. These are used to tweak the "feel" and contrast of a procedural effect.
From Root to Tip: Controlling Effects Along the Strand ($t and $cLength)
Some of the most sophisticated grooming effects are those that vary along the length of each primitive. SeExpr provides two key global variables, $t and $cLength, that enable this level of per-strand control.
$t represents the normalized position along a primitive, where 0 is the root and 1 is the tip. This variable is a gradient that can be used to drive any attribute. For example, one can make hair thinner at the tip by multiplying the Width attribute by 1.0 - $t.
$cLength represents the final, calculated length of a primitive after all other modifiers have been applied. This is useful for creating effects that are proportional to the hair's length. A powerful production example is modulating the effect of a Noise modifier based on length, so that shorter hairs are less affected than longer ones, creating a more believable result.9
Insight in Practice: Creating Tip-Focused Frizz
A common challenge is creating frizz that only affects the tips of the hair, as is common in nature. A naive noise application would make the entire strand noisy. By combining $t with a remapping function, this can be achieved procedurally.
Code snippet
// 1. Generate the base noise pattern.
$freq = 25.0; #1.0, 50.0
$baseNoise = noise($Prefg * $freq);

// 2. Create a mask that is only active near the tip.
// The fit function remaps the top 20% of the strand (t=0.8 to 1.0)
// to a 0-1 mask.
$tipMask = fit($t, 0.8, 1.0, 0.0, 1.0);
$tipMask = clamp($tipMask, 0, 1); // Ensure the mask is clamped.

// 3. Modulate the noise by the tip mask.
$baseNoise * $tipMask
This expression ensures that the noise has zero effect along the first 80% of the hair's length and then smoothly fades in to full strength at the tip, creating a highly realistic and art-directable frizz effect.
Painting with Code: An Introduction to Procedural Color
While texture maps are powerful, it is often more efficient and flexible to generate color variations directly within an expression. This procedural approach is non-destructive and allows for infinite resolution.
The simplest method is to use rand() to pick between colors. A more advanced technique involves using the hsi() function, which allows for the manipulation of a color's Hue, Saturation, and Intensity.7 This is perfect for creating subtle, natural color variations.
For even greater control, the ccurve() function can be used. This creates a color ramp widget in the Expression Editor, which can be driven by any input value, such as noise or the primitive's length ($cLength). This allows an artist to visually design a color gradient that is then applied procedurally across the groom.9
Code Example: Color Variation based on Length
Code snippet
// Use the ccurve function to create a color ramp driven by the
// final computed length of the primitive ($cLength).
// The syntax for a ccurve point is: position, color, interpolation_mode
// Interpolation mode 4 is 'Smooth'.
$color = ccurve($cLength,
    0.0, [0.1, 0.1, 0.1], 4,  // At length 0, color is dark grey
    0.5, [0.8, 0.2, 0.1], 4,  // At length 0.5, color is orange
    1.0, [0.9, 0.9, 0.8], 4   // At length 1.0, color is off-white
);

// Return the final color.
$color
This expression colors shorter hairs dark grey, medium hairs orange, and the longest hairs off-white, with a smooth gradient between them. The artist can interactively change these colors and their positions on the ramp to quickly iterate on the look.
Part 3: Advanced Production Techniques and Effects
This section transitions from learning individual functions to combining them into powerful, production-oriented "recipes." These are step-by-step guides for creating specific, complex effects that are common requirements in professional VFX work.
Intelligent Grooming: Advanced Masking with Conditional Logic (? :)
Conditional logic is the key to creating grooms that behave intelligently, applying different effects to different parts of the groom based on a set of rules. While SeExpr supports a full if-else block structure, the most common and efficient way to implement conditional logic is with the ternary operator (? :).18
The syntax is: condition? value_if_true : value_if_false.
This compact structure is incredibly powerful for creating procedural masks. The "Percentage Mask" from Jesus FC's tutorial is a perfect example.1 It uses a random number as a condition to select a certain percentage of primitives. This is far more flexible than Maya's built-in
stray() function, as it can be layered and customized infinitely.
Code Example: An Advanced Stray Hair Mask
This expression builds on the basic percentage mask to create a more robust system for controlling stray hairs, a technique often used in production.9
Code snippet
// 1. Create a slider to control the percentage of hairs designated as "strays".
$strayPercentage = 5.0; #0.0, 100.0

// 2. Define the magnitude of a noise effect for normal vs. stray hairs.
$normalMagnitude = 0.1; #0.0, 1.0
$strayMagnitude = 2.0; #0.0, 5.0

// 3. The Condition: Generate a random number between 0 and 100 for each hair
// and check if it's less than our desired percentage.
$isStray = rand(0, 100, $id) < $strayPercentage;

// 4. The Ternary Operation: If $isStray is true, return the large magnitude.
// Otherwise, return the normal magnitude.
$isStray? $strayMagnitude : $normalMagnitude
When placed in the Magnitude attribute of a Noise modifier, this expression will cause 5% of the hairs to be affected much more strongly by the noise, creating a natural, chaotic "stray" effect that is fully art-directable via the sliders.
The Procedural Effects Cookbook
The following are detailed recipes for creating common, complex grooming effects by layering multiple modifiers and expressions.
Recipe 1: The "Wet Look"
Achieving a believable wet look for fur or hair is about controlling clumping and specularity. Wet hair sticks together in stringy, defined clumps and has a much higher, tighter specular sheen than dry hair.
Methodology:
- Primary Clumping: The foundation of the wet look is strong, large-scale clumping. Add a
Clumpingmodifier. In the "Setup Maps" dialog, generate a low-density map (e.g., Density = 0.5) to create a few large, primary clumps.19 Increase the Clumpvalue in the modifier's attributes to make these clumps tight.- Secondary, Stringy Clumps: To create the characteristic stringy look, add a second
Clumpingmodifier above the first one. For this modifier, generate a much higher density map (e.g., Density = 10.0). This will create many small clumps within the larger ones. - Procedural Clump Breakup: To make the clumping look more natural and less uniform, drive the
Clumpattribute of the second clumping modifier with a noise expression. A simplefbm()can introduce variation in how tightly the smaller clumps bind together. - Flattening: Wet hair loses volume. Use the
Flatnessattribute in theNoisemodifier (or a dedicatedNoisemodifier) to compress the clumps, especially towards the tips. AFlatness Effectvalue around 0.5-0.8 can work well.20 - Shader Adjustments: In the hair shader (e.g., Arnold Standard Hair), a key change is to increase the
Specular IOR(Index of Refraction). The IOR of water is approximately 1.33, while dry hair is closer to 1.55. Lowering the IOR towards water's value and potentially decreasing theRoughnesswill create the hard, wet-looking sheen.21
Recipe 2: Simulating Wind with Vector Math
While XGen has a dedicated Wind modifier, creating a more art-directable and nuanced wind effect can be achieved procedurally using a Noise modifier and vector math.22 This approach allows for animated, turbulent gusts that feel more natural.
Methodology:
- Use a Noise Modifier: Add a
Noisemodifier to the groom. The effect will be driven by itsDisplacementattribute, which expects a vector[x, y, z]value. - Create Animated 3D Noise: The core of the effect is an animated 3D noise field. The
vnoise()function is perfect for this as it returns a 3D vector. We will use the$framevariable to animate the noise over time. - Control Direction and Strength: The raw output of
vnoise()is chaotic. To control it, we will blend it with a constant direction vector.
Code Example for Displacement:
Code snippet
// --- Wind Controls ---
$windStrength = 2.5; #0.0, 10.0
$windDirection = [1.0, 0.2, 0.0]; # Vector Widget
$turbulence = 0.5; #0.0, 2.0
$windSpeed = 0.1; #0.0, 1.0

// --- Noise Calculation ---
// Animate the noise lookup position over time using $frame.
$time = $frame * $windSpeed;
$noisePos = $Prefg + [0, 0, $time];

// Generate a 3D vector noise (turbulence).
$turbVector = vnoise($noisePos) * $turbulence;

// --- Final Calculation ---
// Blend the base wind direction with the turbulence.
// normalize() ensures the final direction is a unit vector.
$finalDirection = normalize($windDirection + $turbVector);

// Apply the final strength.
$finalDirection * $windStrength
This expression creates a convincing wind effect. $windDirection sets the primary direction of the wind, $turbulence adds chaotic gusts, $windSpeed controls how fast the turbulence evolves, and $windStrength controls the overall magnitude.
Recipe 3: Crafting Realistic Flyaways and Breakup
The final 10% of realism in a groom often comes from imperfections: the fine, chaotic flyaway hairs that break the silhouette and catch the light. This effect can be built by combining conditional logic with multi-layered noise.
Methodology:
- Isolate Flyaways: Use a
Noisemodifier. In itsMaskattribute, use the ternary operator to create a percentage-based mask, isolating a small fraction of hairs (e.g., 1-2%).23 - Apply High-Frequency Noise: In the
Magnitudeattribute of the sameNoisemodifier, use a high-frequencyfbm()expression. This will make the isolated flyaway hairs very frizzy and chaotic. - Modulate by Length: To make the effect more realistic, multiply the
Magnitudeexpression by a ramp controlled by$t. This ensures the flyaway effect is strongest at the tips of the hairs and weaker near the root.
Code Example for Mask:
rand(0, 100, $id) < 2.0? 1.0 : 0.0 // Affects 2% of hairs
Code Example for Magnitude:
Code snippet
// High-frequency noise for frizz
$frizz = fbm($Prefg * 50.0) * 3.0;

// Ramp to make effect stronger at the tips
$tipRamp = smoothstep(0.5, 1.0, $t);

// Final magnitude
$frizz * $tipRamp
This combination creates highly realistic, art-directable flyaway hairs that significantly enhance the final groom.
Bridging the Gap: Connecting Expressions to Shaders
A powerful, advanced technique is to pass data generated by expressions directly to the shader at render time. This allows for creating render-time effects that would be difficult or impossible to achieve otherwise, such as intricate color patterns that are perfectly mapped to the procedural groom.
The workflow involves creating a Custom Shader Parameter in the Preview/Output tab of the XGen Editor. This creates a named attribute on the geometry that can be read by the shader.24
Step-by-Step Workflow (with Arnold Renderer):
- Create Custom Parameter in XGen: In the XGen Editor, navigate to the
Preview/Outputtab. Under "Custom Shader Parameters," type a name for the attribute (e.g.,proceduralColor) and set its type (e.g.,Color). Click the+button. - Write an Expression for the Parameter: Click the expression icon (Σ) next to the newly created parameter. In the Expression Editor, write an expression that returns a color value. This could be a noise pattern, a
ccurve()ramp, or any other color-generating expression.
Code snippet
// Example: A simple black and white cellular pattern
cellnoise($Prefg * 10.0) > 0.5?  :
- Read the Attribute in the Shader: In the Hypershade, create an
aiUserDataColornode. In itsColor Attr Namefield, type the exact name of the custom parameter you created in XGen (proceduralColor). - Connect to Shader: Connect the output of the
aiUserDataColornode to an input on your hair shader, such as theBase Colorof anaiStandardHairmaterial.
At render time, Arnold will execute the XGen expression for each hair, pass the resulting color value into the proceduralColor attribute, which is then read by the aiUserDataColor node and fed into the shader, creating a perfectly mapped procedural color pattern.
Bringing Grooms to Life: Animating Parameters with $frame
The global variable $frame provides a direct link to Maya's timeline, enabling the creation of animated procedural effects. Any expression that incorporates $frame will evaluate to a different result on each frame, producing animation.
This can be used for simple effects, like making a noise pattern evolve over time, or for more complex, periodic motions using trigonometric functions like sin() and cos().
Code Example: Pulsing Growth Effect in Length
Code snippet
// Base length of the primitives
$baseLength = 1.0;

// Speed of the pulse (higher value = faster pulse)
$speed = 0.2;

// Calculate a sine wave based on the current frame.
// sin() returns a value between -1 and 1.
// We add 1 and multiply by 0.5 to remap it to a 0-1 range.
$pulse = (sin($frame * $speed) + 1.0) * 0.5;

// Add the pulsing value to the base length.
$baseLength + $pulse
This expression will cause the primitives to smoothly grow and shrink over time, creating an organic pulsing effect. This technique can be applied to almost any attribute to add dynamic, procedural animation to a groom.
Part 4: The XGen Expressionist's Toolkit
Becoming proficient with XGen expressions involves more than just learning functions; it requires developing an efficient workflow, knowing how to troubleshoot problems, and understanding the tool's place in the broader industry context. This final section provides the tools and knowledge to transition from simply using expressions to mastering them.
Building Your Personal Library: Saving and Organizing Expressions
As artists develop solutions to grooming challenges, they will create complex and useful expressions. Instead of rewriting them for every project, it is essential to build a personal library of reusable code snippets. The XGen Expression Editor facilitates this through its "Save" and "Library" features.6
When an expression is complete and tested, using Save As... in the editor's File menu will save it as a .se file. By default, these are saved to a user-specific XGen directory. These saved expressions then appear in the Library tab of the editor, where they can be quickly applied to any attribute.
For larger teams or studios, it is best practice to establish a centralized library of expressions. This can be done by setting the XGEN_CONFIG_PATH environment variable to point to a shared network location.25 This ensures that all artists on a project have access to the same set of production-tested tools, promoting consistency and efficiency.
Common Errors and Solutions: A Troubleshooting Guide
Working with expressions inevitably involves troubleshooting. Most issues fall into a few common categories, and understanding them can save hours of frustration.
- Problem: The groom flickers, jitters, or "swims" during animation.
- Cause: A noise function is likely using the
$Pglobal variable, which evaluates on the deformed mesh. - Solution: Replace
$Pwith$Prefg. This evaluates the noise on the static bind-pose mesh, creating a stable pattern that sticks to the surface as it deforms.10
- Cause: A noise function is likely using the
- Problem: The Expression Editor shows a syntax error, or the expression evaluates to a default value (like 0.001).
- Cause: This is typically a simple syntax mistake. The most common are missing semicolons (
;) at the end of variable declarations, misspelled function or variable names, or an incorrect number of arguments passed to a function. - Solution: Carefully re-read the expression, paying close attention to the color-coded syntax highlighting. Check for missing
$prefixes on variables and ensure all parentheses are correctly matched.
- Cause: This is typically a simple syntax mistake. The most common are missing semicolons (
- Problem: The groom does not update after editing an expression.
- Cause: XGen's viewport preview sometimes does not automatically refresh.
- Solution: Force an update by clicking the preview refresh icon (the eye) in the XGen window, or by toggling a modifier off and on. Ensure that "Update Preview Automatically" is enabled if an immediate response is desired.26
- Problem: A
map()expression fails, and the groom renders as if the map is black.- Cause: The file path is incorrect, or the file does not exist. This often happens when projects are moved or opened on a different machine.
- Solution: Ensure the path is correct and uses the
${DESC}variable for portability. Verify that the Ptex file exists at the specified location. Remember that XGen paths must use forward slashes (/), not backslashes (\).14
Appendix: The XGen SeExpr Function Quick Reference
This appendix provides a quick-reference table for the most commonly used functions in XGen expressions, categorized for ease of use.


